3. Installation
Warning
It is assumed that the user who is installing and setting up the Connectivity Suite has read and understood the installation prerequisites (see Section 3.1), otherwise an installation won’t be possible.
3.1. Prerequisites
3.1.1. System requirements for a Connectivity Suite instance
3.1.2. Supported devices
3.1.3. Amount of connected Devices
The number of tenants and devices that can be connected to the Connectivity Suite depends on the hardware resources. The greater the RAM and CPU performance, the more tenants and devices can be connected.
Warning
Insufficient system resources can cause devices to lose connection and Connectivity Suite operation can no longer be guaranteed.
There are two ways to allocate additional resources. One option is that the Connectivity Suite instance gets more RAM and CPU performance or you install remote Tenants to allocate more ressources. Unfortunately, there are no guidelines on how much to increase system performance per unit. This depends on the operations and functions used on both the Connectivity Suite and devices. This is specific to each installation. The first option is to increase the system resources for the Connectivity Suite instance. The number of devices to be connected depends on the RAM and CPU performance.
3.1.3.1. Allocate more hardware ressources by increasing server performance
The first option is to increase the system resources for the Connectivity Suite instance. The number of devices to be connected depends on the RAM and CPU performance. If more RAM and CPU performance are made available, more devices can be connected.
3.1.3.2. Allocate more hardware ressources by adding remote Tenants
The second option is that Tenants are installed on remote servers so that they can access resources from additional servers (see chapter Section 3.1.1 for the installation of a remote Tenant). A dedicated server exclusively used for Remote Tenants can allocate resources only for the Tenant and the devices connected to the tenant. This allows the user to connect significantly more devices to the remote Tenant than to a conventional Tenant as shown in the example below:
3.1.4. Domain name
3.1.4.1. FQDN
A FQDN is needed which points to the IP address of the server where the Connectivity Suite is installed.
If you want to use TLS certificates issued by Let’s Encrypt, this FQDN must be publicly known and accessible.
This same FQDN is also used for the routers to connect to the Connectivity Suite as well as for the users to access the Web UI.
3.1.4.2. Devices CNAME (Subdomain)
To be able to use the web proxy a devices CNAME DNS record is necessary. Example:
Name |
Type |
Value |
|
|---|---|---|---|
devices.cs.mycompany.com |
CNAME |
cs.mycompany.com |
|
Example
Name |
Type |
Value |
|
|---|---|---|---|
devices.cs.mycompany.com |
A |
10.42.42.42 |
|
devices.cs.mycompany.com |
CNAME |
cs.mycompany.com |
|
3.1.5. SSH
Installed OpenSSH server on the Ubuntu server
SSH on the devices must be enabled and open for OpenVPN tunnels. The Connectivity Suite uses SSH connections via an OpenVPN tunnel to manage the devices.
3.1.6. Network Connections
The server must have access to the internet. Therefore, the following ports must be opened for incoming connections to the server:
Protocol |
Port |
Description |
|---|---|---|
TCP |
SSH port 1) |
For management access (automated deployment of Tenants etc.) |
TCP |
80 2) |
Certbot (for certificate renewal) |
TCP |
443 3) |
Tyk Gateway (for accessing the API) |
UDP |
1194 4) |
OpenVPN Home Server |
UDP |
1195 4) |
OpenVPN Provisioning Server |
UDP |
Custom 4) |
OpenVPN Tenant Servers (one port per Tenant) |
Loopback connections must be allowed for the ports TCP 22 and TCP 443 (i.e. the server must be able to establish SSH and HTTPS connections to itself using its FQDN).
Only required if you want to use TLS certificates issued by Let’s Encrypt.
If all the users of the Connectivity Suite UI are located inside the company network, port 443 need not be opened to the outside world.
If all the routers managed by the Connectivity Suite are located inside the company network, these UDP ports need not be opened to the outside world.
Note
The router through which the Connectivity Suites accesses the internet must support the NAT loopback functionality. If this is not the case, operation of the Connectivity Suite will not be possible. A list of routers that fulfil the functionality can be found at the following link: http://opensimulator.org/wiki/NAT_Loopback_Routers
3.1.7. Private subnetworks
Two subnetworks out of the private IP address space are needed. The two subnetworks must not overlap with other private networks in use. The subnetworks will be required during the initialization of the Connectivity Suite (see Section 3.3).
The first subnetwork is for the Core network, which is used to run the application infrastructure. Its size is fixed to 4096 addresses, i.e. a /20 subnetwork.
The second one is for the Home network. It contains all the routers, as well as all the end devices connected to them. Choose it large enough, as it cannot be enlarged later. Its size can be roughly estimated like this:
If there is no need to access the end devices, the minimum size of the Home network corresponds to the number of routers you want to connect to the CS.
If you want to access the end devices behind the routers, the minimum size of the Home network is [number of routers] * [average number of end devices behind a single router].
Because the Home network will be divided into several address pools during the installation process, its size cannot be smaller than 4096 addresses (a /20 network).
The image below shows what a system architecture can look like and provides an examples what thoughts have to be made in advance to the installation.
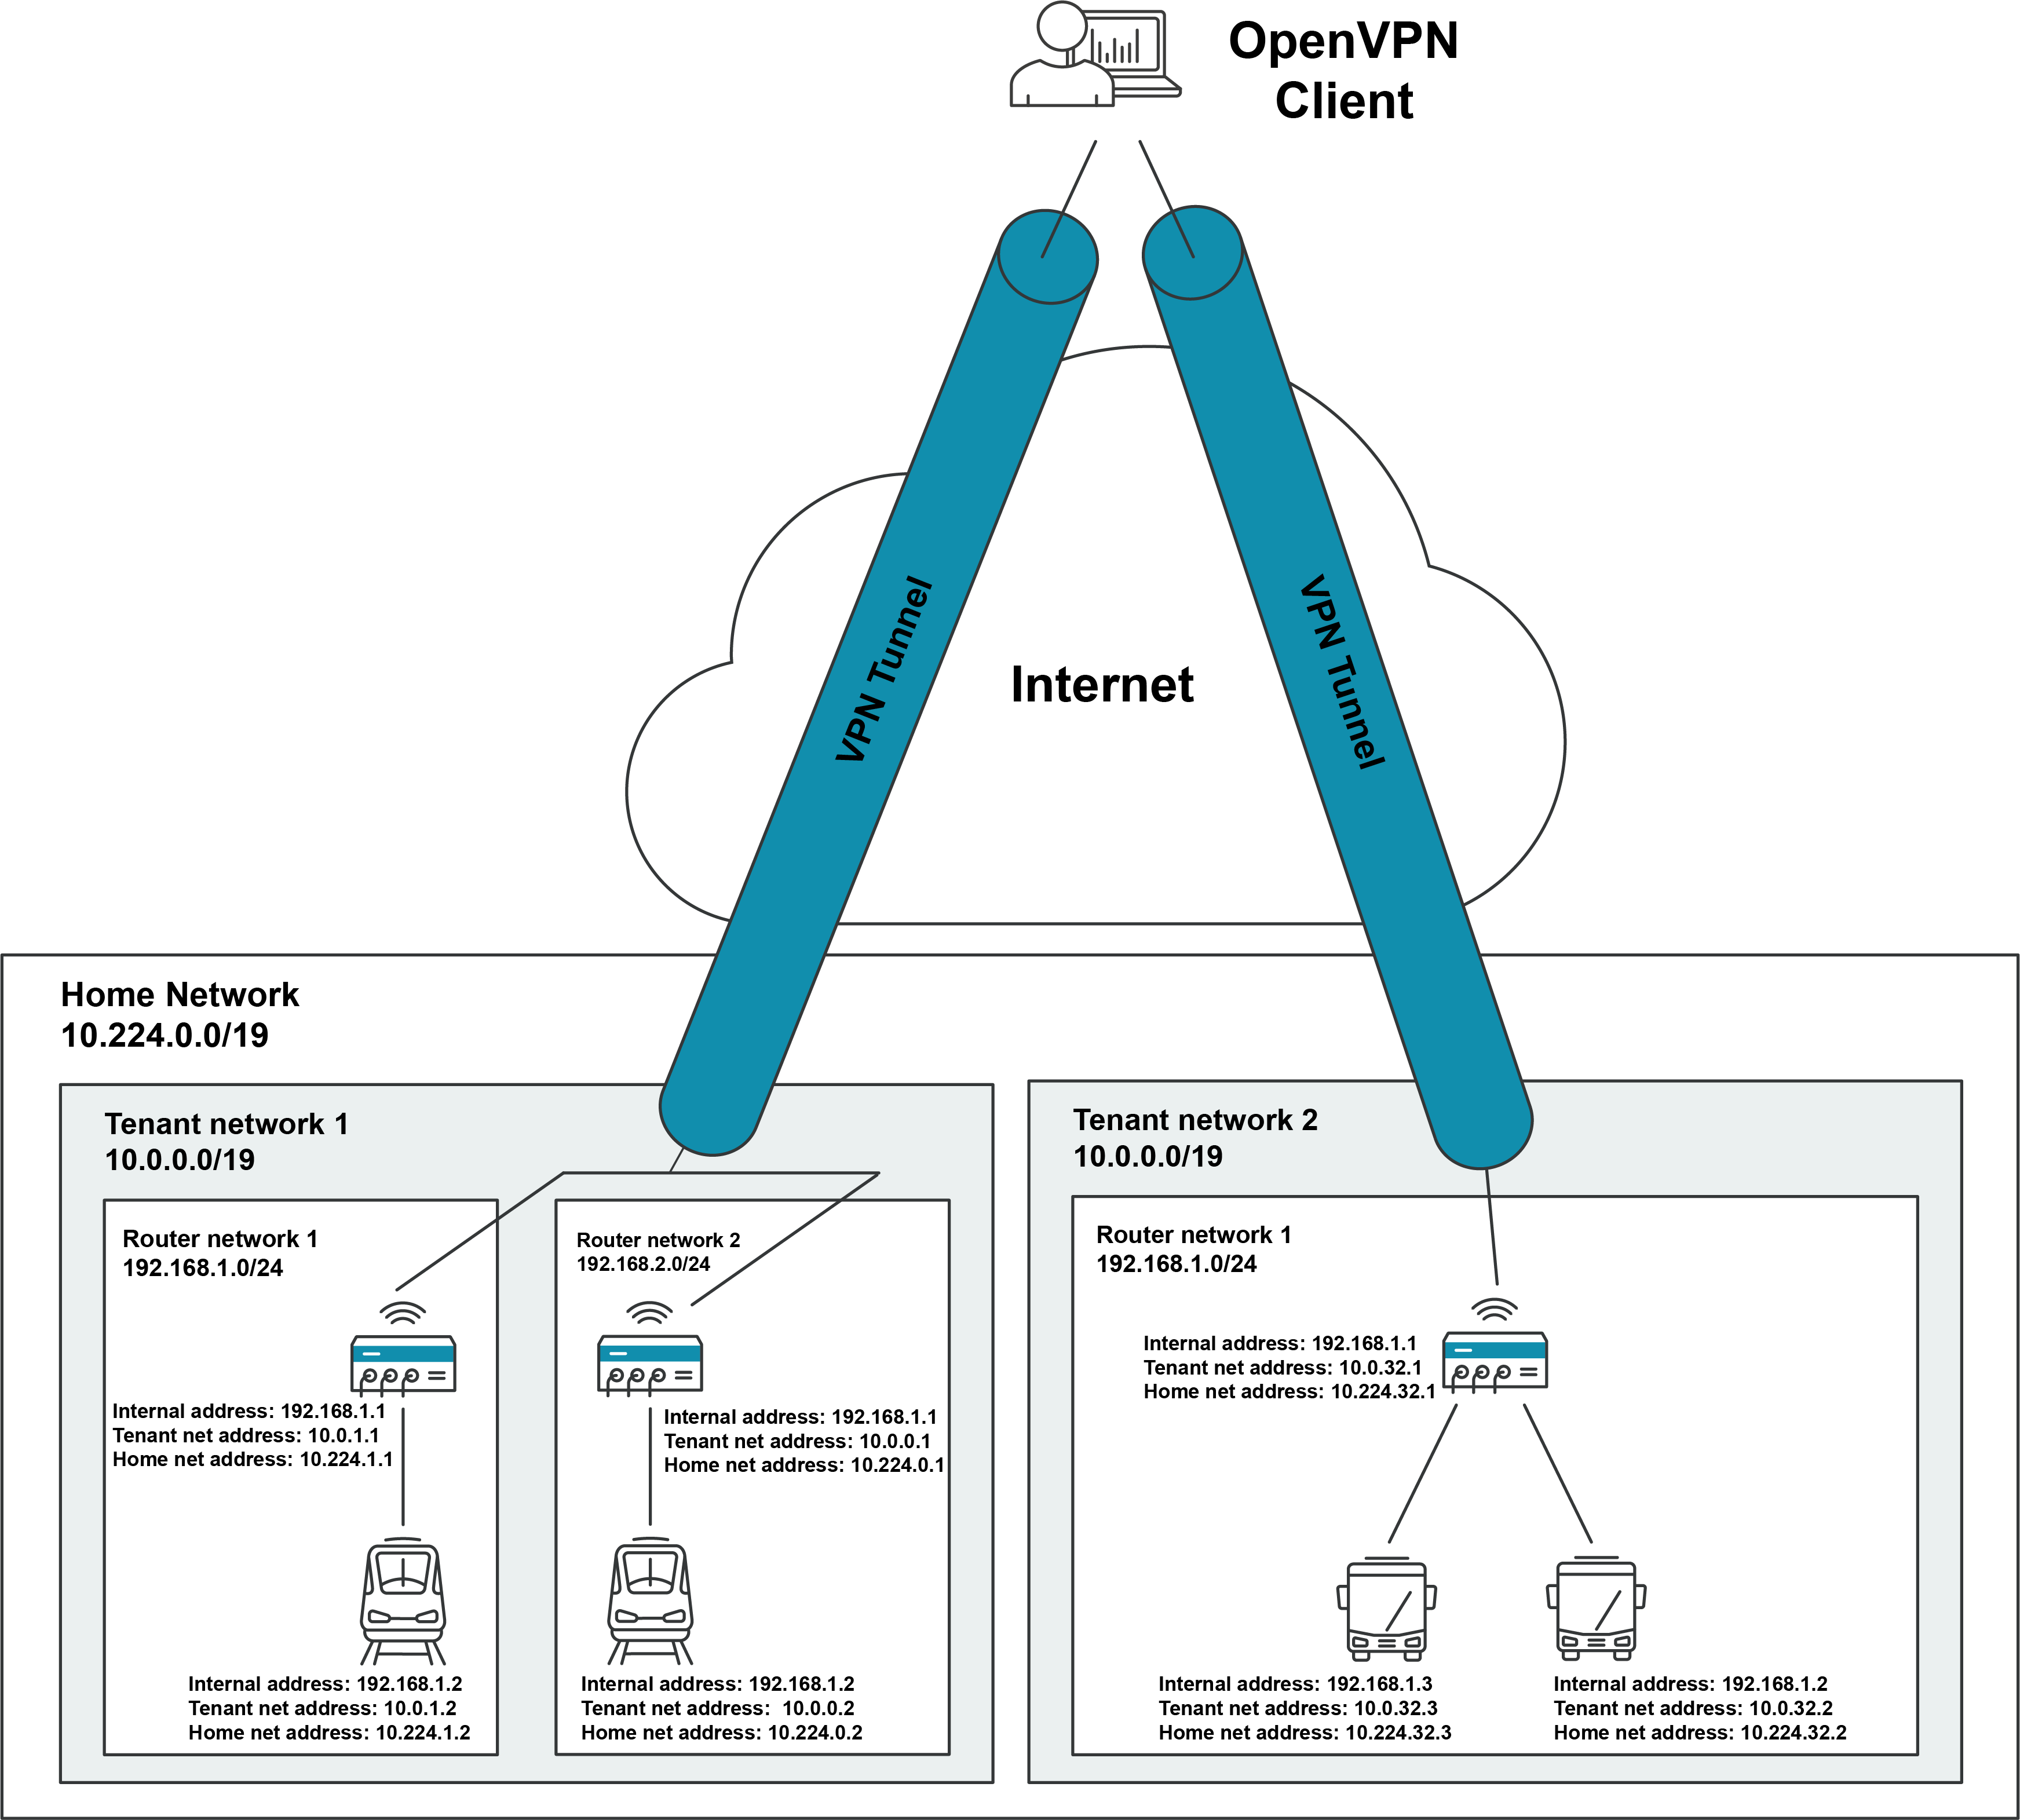
Fig. 3.1 Example architecture
Example system architecture
Note
The Connectivity Suite supports only IPv4 operation in IPv6 networks wont be possible.
3.2. Installing the Connectivity Suite and prerequisites
To be able to run the Connectivity Suite on-premises, several prerequisites must be installed, and the Connectivity Suite must be initialized.
Warning
Only a sudo user can execute installations. Do not install while being logged in as a root user, it wont work.
Log into your server where the Connectivity Suite will be installed as a user who has root privileges (superuser)
Download the Software from the Connectivity Suite Gitlab repository (for the following steps it is assumed that the folder is named cs). The link and credentials for the Gitlab repository are provided by NM incl. a Read Me Instruction on how to download the software to the server.
Run the script cs-install-ubuntu from the cs/scripts folder on the server.
After executing the script, the User is prompted to enter the hostname of the server which hosts the Connectivity Suite.
The prerequisites are installed, and the latest Docker images are pulled automatically, this step takes some time.
If a certificate for the SSL connection exists already you will be prompted to decide if the certificate should be renewed or kept.
When prompted, log out.
3.3. Initializing the Connectivity Suite
After the installation the Connectivity Suite must be initialized. During this process the Core Network is con-figured. For details regarding the network configuration and layout see Section 7.
Log in to your server where the Connectivity Suite has been installed as a user which has root privileges (superuser).
Run the script reset-data from the cs/scripts folder.
Warning
Attention! The following steps can only be configured during the installation and are only reversible by doing a re-installation (which means you will lose all the stored data).
Configure the Core Network in the format xxx.xxx.xxx.xxx/20. It is mandatory to use a subnet mask of 20 (see Section 7 for more detailed description).
Configure the Home Network in the format xxx.xxx.xxx.xxx/xx and make sure the subnet is greater than 20. Also be aware that as example a subnet of 20 does not mean that you will be able to connect 4096 devices there is a big reduction based on the network architecture. (see Section 7 for more detailed description).
Warning
Attention! The Home Network restricts the amount of Devices and End Devices which can be connected to the Connectivity Suite. If the Home Network is too small you wont be able to connect your devices.
When prompted choose between default settings for your Network layout or do the settings by yourself. If you choose the default settings step 6-11 can be skipped.
Warning
Only experienced users are allowed to do the settings in step 6-11.
Choose your preferred Home Network layout (you have the option of three given layouts).
Enter a name for the Tenant type.
Enter the number of max. required Tenants. Be aware that if the number set during this step is too small this cannot be changed afterwards.
Configure the size of the Tenant, the default network (in the format xxx.xxx.xxx.xxx).
Enter the number of max. required End Devices. Be aware that if the number set during this step is too small this cannot be changed afterwards.
Enter the number of concurrent Service Access sessions. Be aware that if the number set during this step is too small this cannot be changed afterwards.
Warning
Step 7-11 may need to be repeated, depending on the chosen Home Network layout in step 6.
Choose a username for the platform administrator account (see Section 10.4 for the user roles). Wait for the initialization process to finish, this takes a while. Be aware that the username cannot be changed afterwards.
Choose if you want Let’s Encrypt or the Connectivity Suite certification authority to be used to issue the SSL certificate to access the UI.
Note
If you choose the Connectivity Suite certification authority to issue the SSL certificate, it is not required for port 80 to be open for incoming connections in your firewall! However, your browser is going to display a warning the first time you open the Connectivity Suite UI. This is normal behaviour. In order to make this warning disappear, your browser needs to trust the Connectivity Suite Root Certification Authority. The procedure varies for different browsers (see Section 3.4).
Note
Note that some domains which are automatically created by providers such as AWS are not accepted by Let’s Encrypt and can therefore not be used.
As soon as the process is finished, the login data and the address of the Connectivity Suite UI is shown, log into the UI using these credentials.
After the first login the user will be requested to change the password.
After changing the password, the Connectivity Suite will be ready for use.
3.4. Browser settings Connectivity Suite SSL Certificate
Downloading the Connectivity Suite Root CA certificate using Microsoft Edge
Click on Certificate Error to the left of the address bar
Choose the Connectivity Suite Root CA from the menu on the right
Click on Export to file, this is the file that needs to be imported using one of the import procedures described below
Making your browser trust the Connectivity Suite Root CA
The client operating system or browser now needs to have the CA certificate added to its list of trusted CAs. The instructions vary by operating system and browser but instructions for a few major browsers are listed below.
Client (Operating System, Browser) |
Instructions |
|---|---|
Microsoft Windows |
Right click the CA certificate file and select ‘Install Certificate’. Follow the prompts to add the certificate to the trust store either for the current user only or all users of the computer. |
Firefox |
Firefox does not use the operating systems trust store so the CA needs to be added manually. Manually add certificates and manage added certificates through Firefox’s Privacy & Security preferences. More information can be found on Mozilla Wiki |
Chrome |
If Chrome is configured to use the Windows trust store, adding the certificate to Windows (see above) is sufficient to add trust to the browser as well. Otherwise the certificate can be added manually using the following procedure: Open Settings > Advanced > Manage Certificates > Authorities, and select Import. |
Edge/Internet Explorer |
Edge/Internet Explorer uses the Windows trust store so adding the certificate to Windows (see above) is sufficient to add trust to the browser as well. |