Connectivity Suite offers two options for remote access to Devices (incl. end/child-devices).
Web Proxy Access via Browser
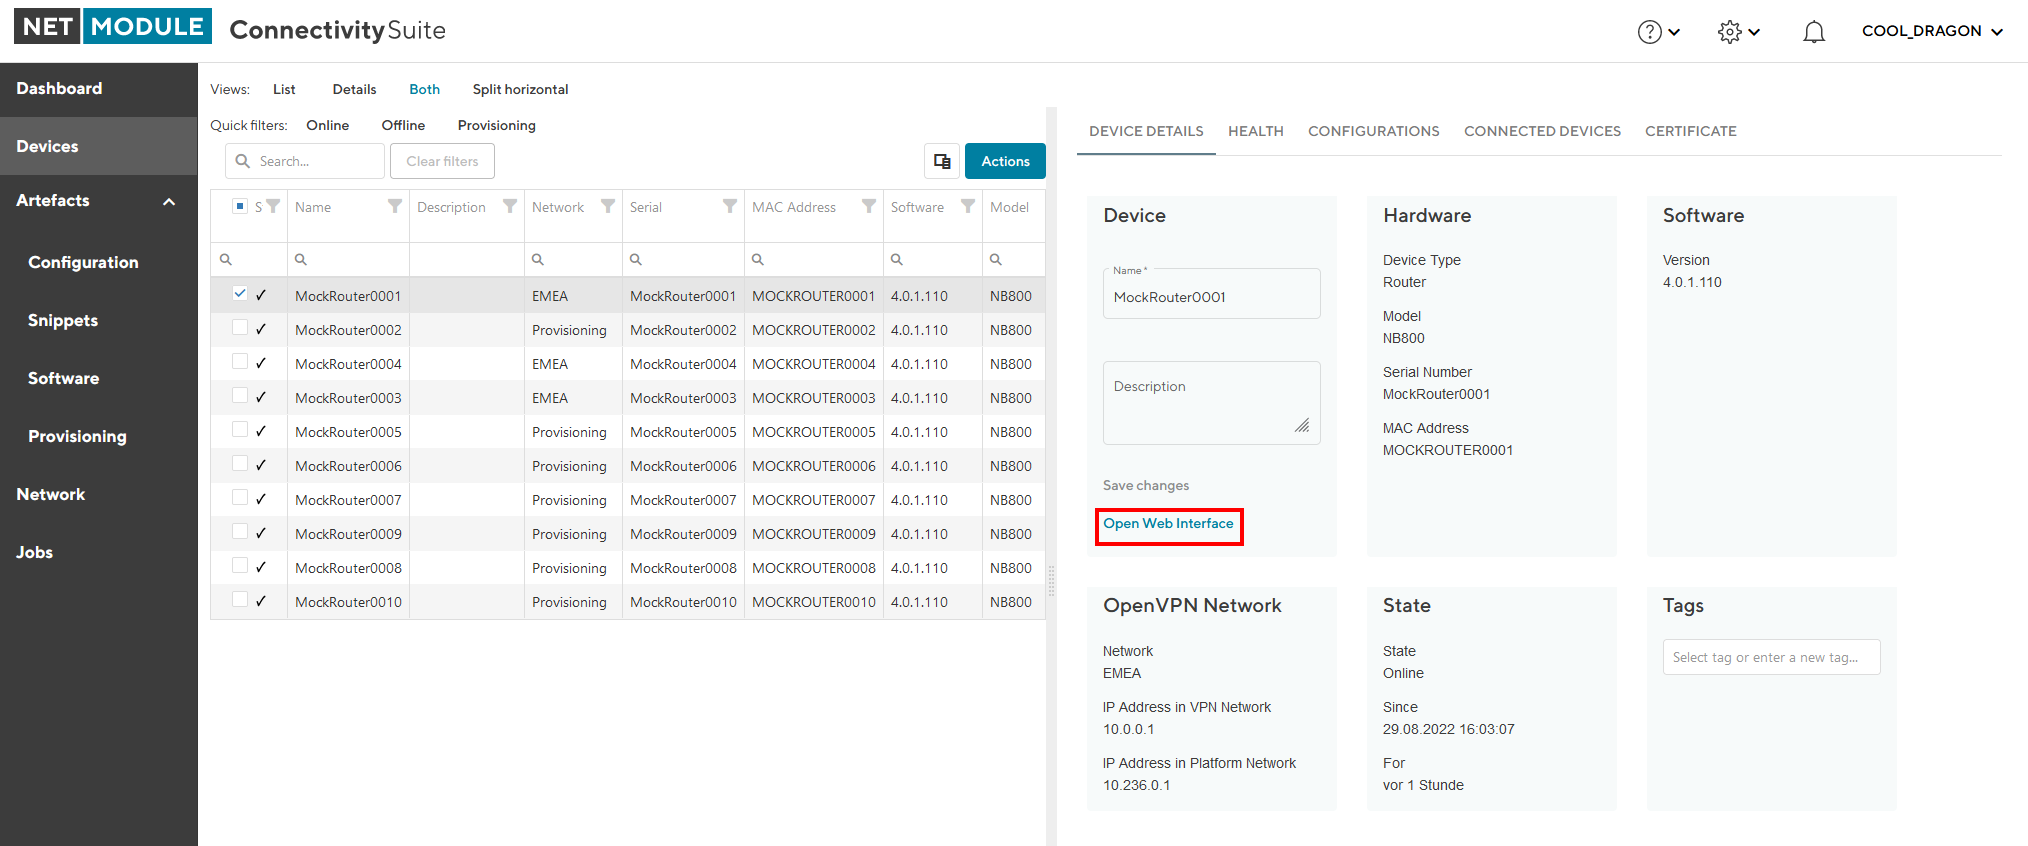
The Web Interface of Devices can be reached through a Web Proxy. In addition there you can enable Proxy Records Section 11.1.2, which allow a static and direct web access to devices as well as to end-devices.
Service Access via VPN
As per the chapter Section 11.2, a full network service access allows managing devices and end-devices.
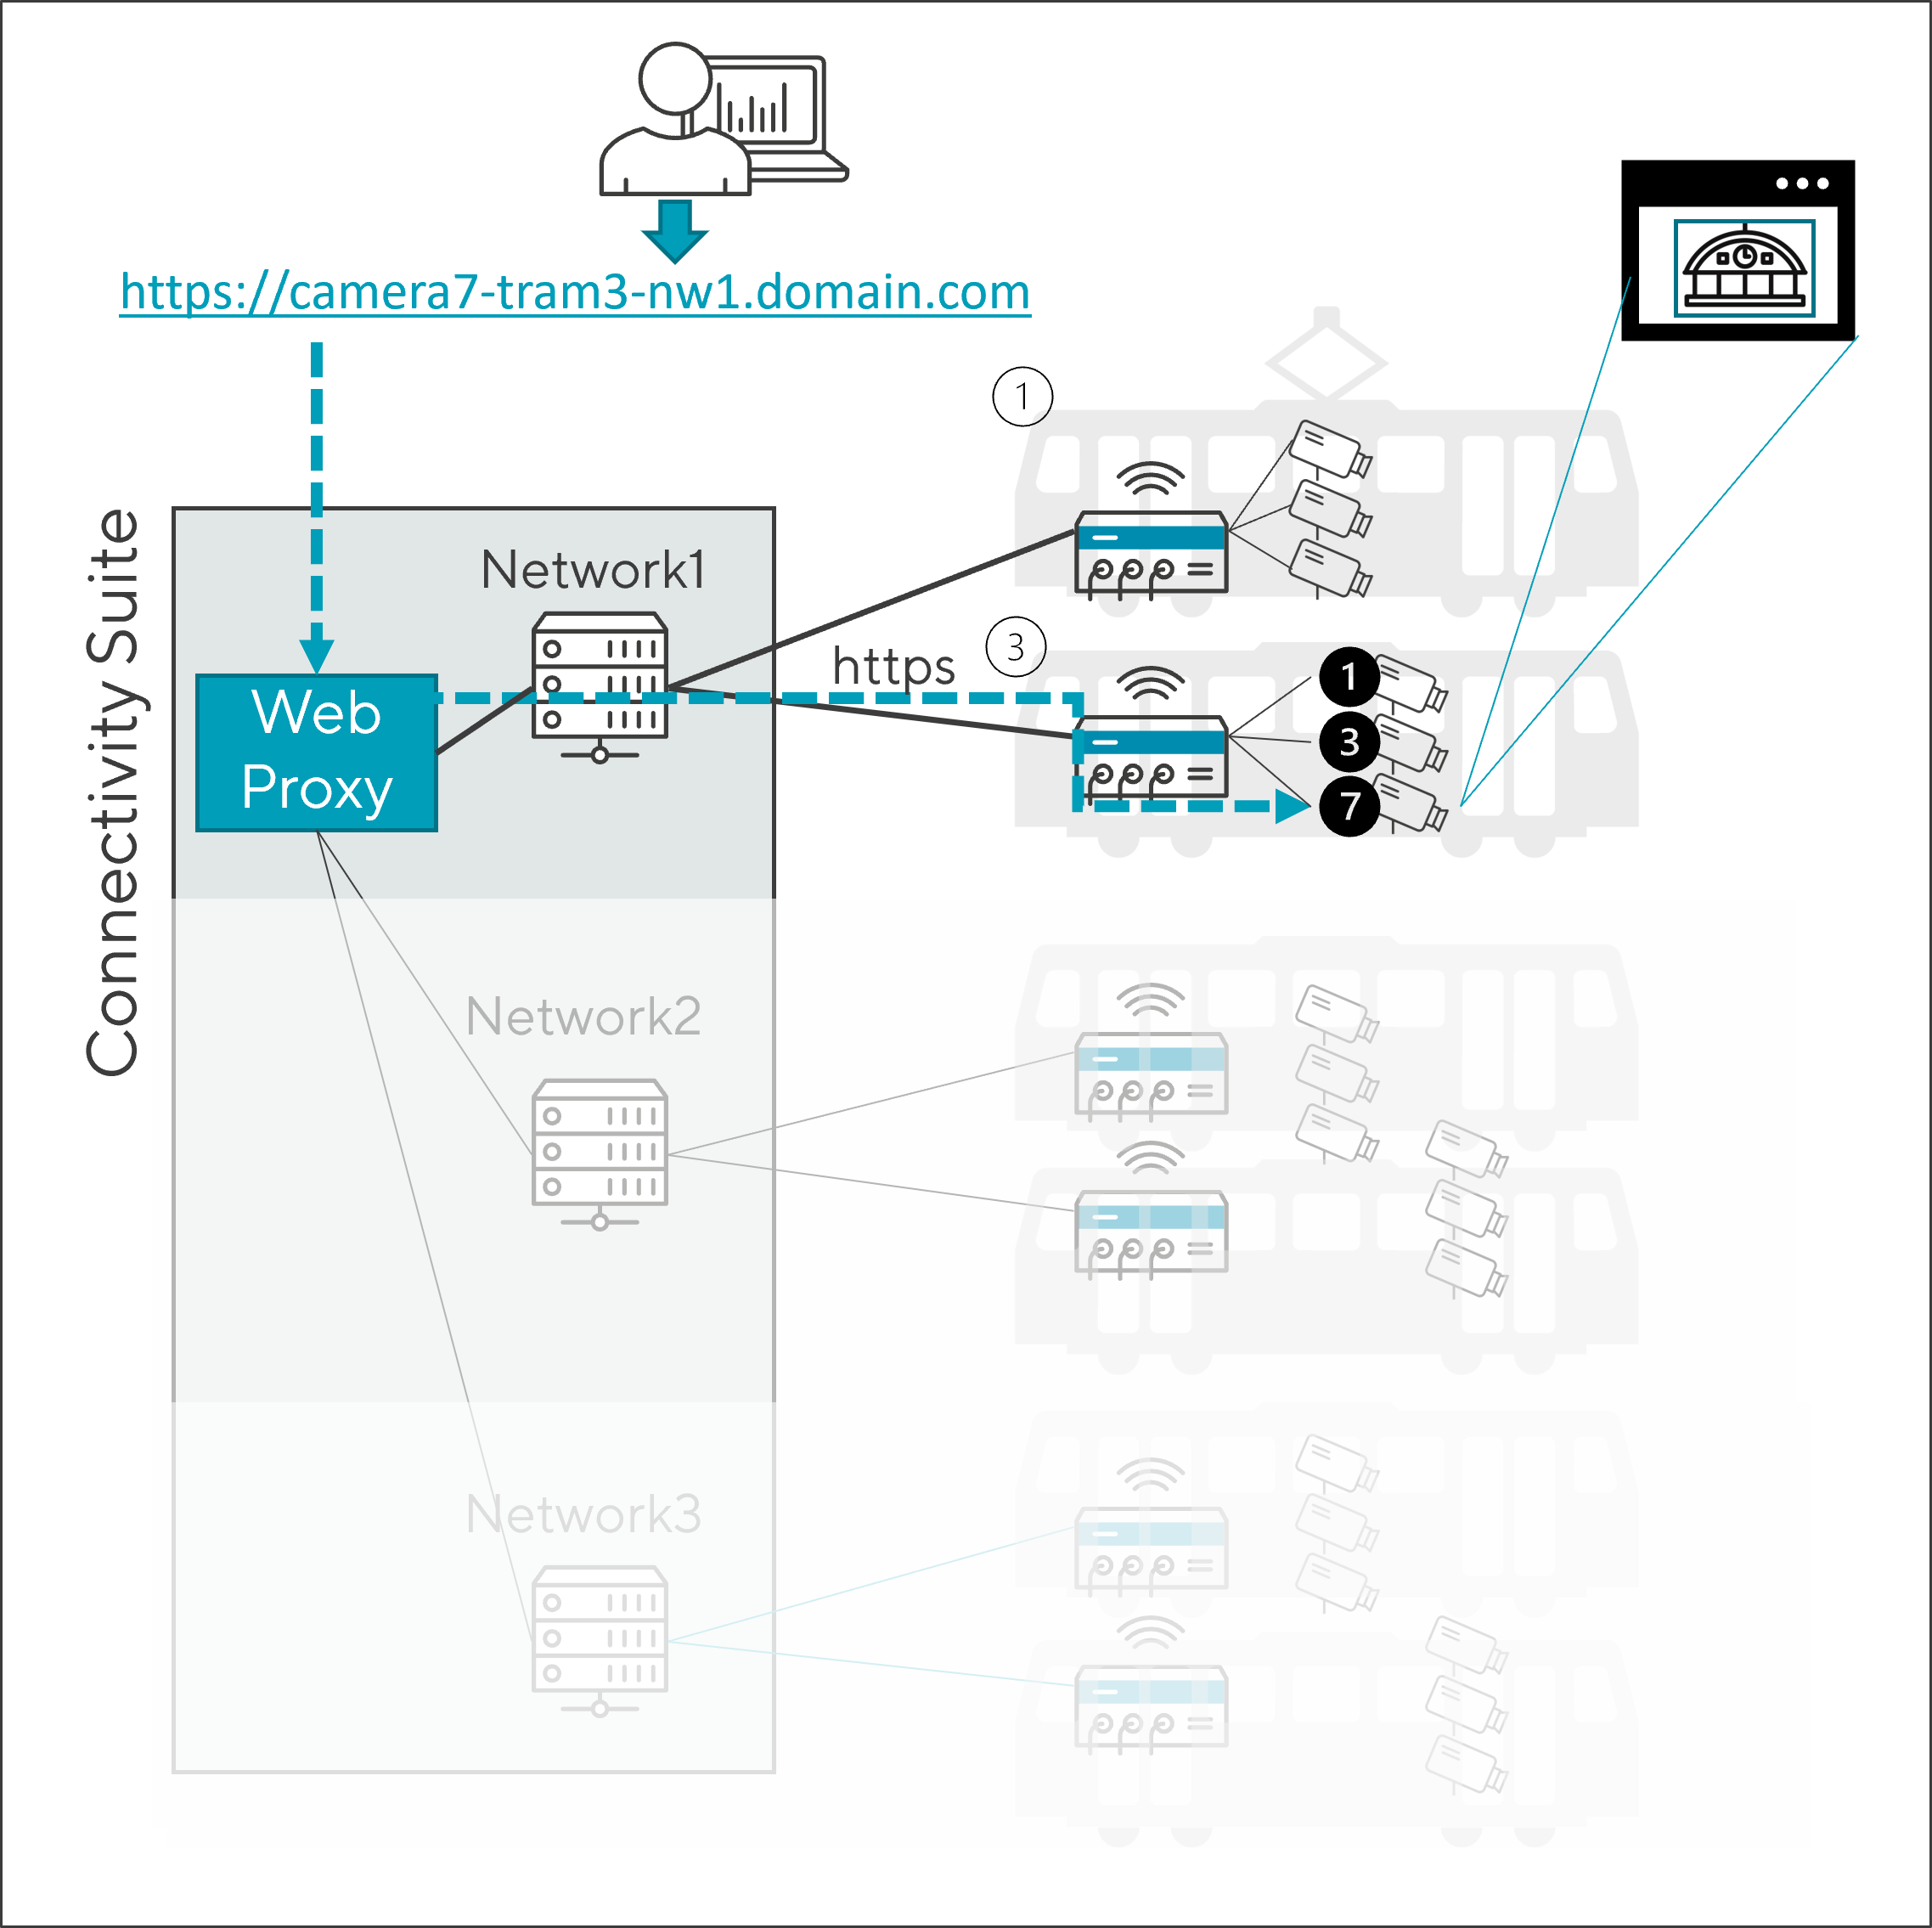
The Connectivity Suite web proxy enables access to the web interface of the Child Devices to the Connectivity Suite OpenVPN servers without having to run an OpenVPN client locally.
You must use the cs-cmd tool to enable or disable the Proxy Records feature. This can be done through the command line interface by navigating to the >ConfigureProxyRecordsFeature menu and setting the status to >enable.
Depending on which HTTPS CA is being used, the corresponding configurations need to be made.
LetsEncrypt
Add CNAME according to instructions provided in cs-cmd.
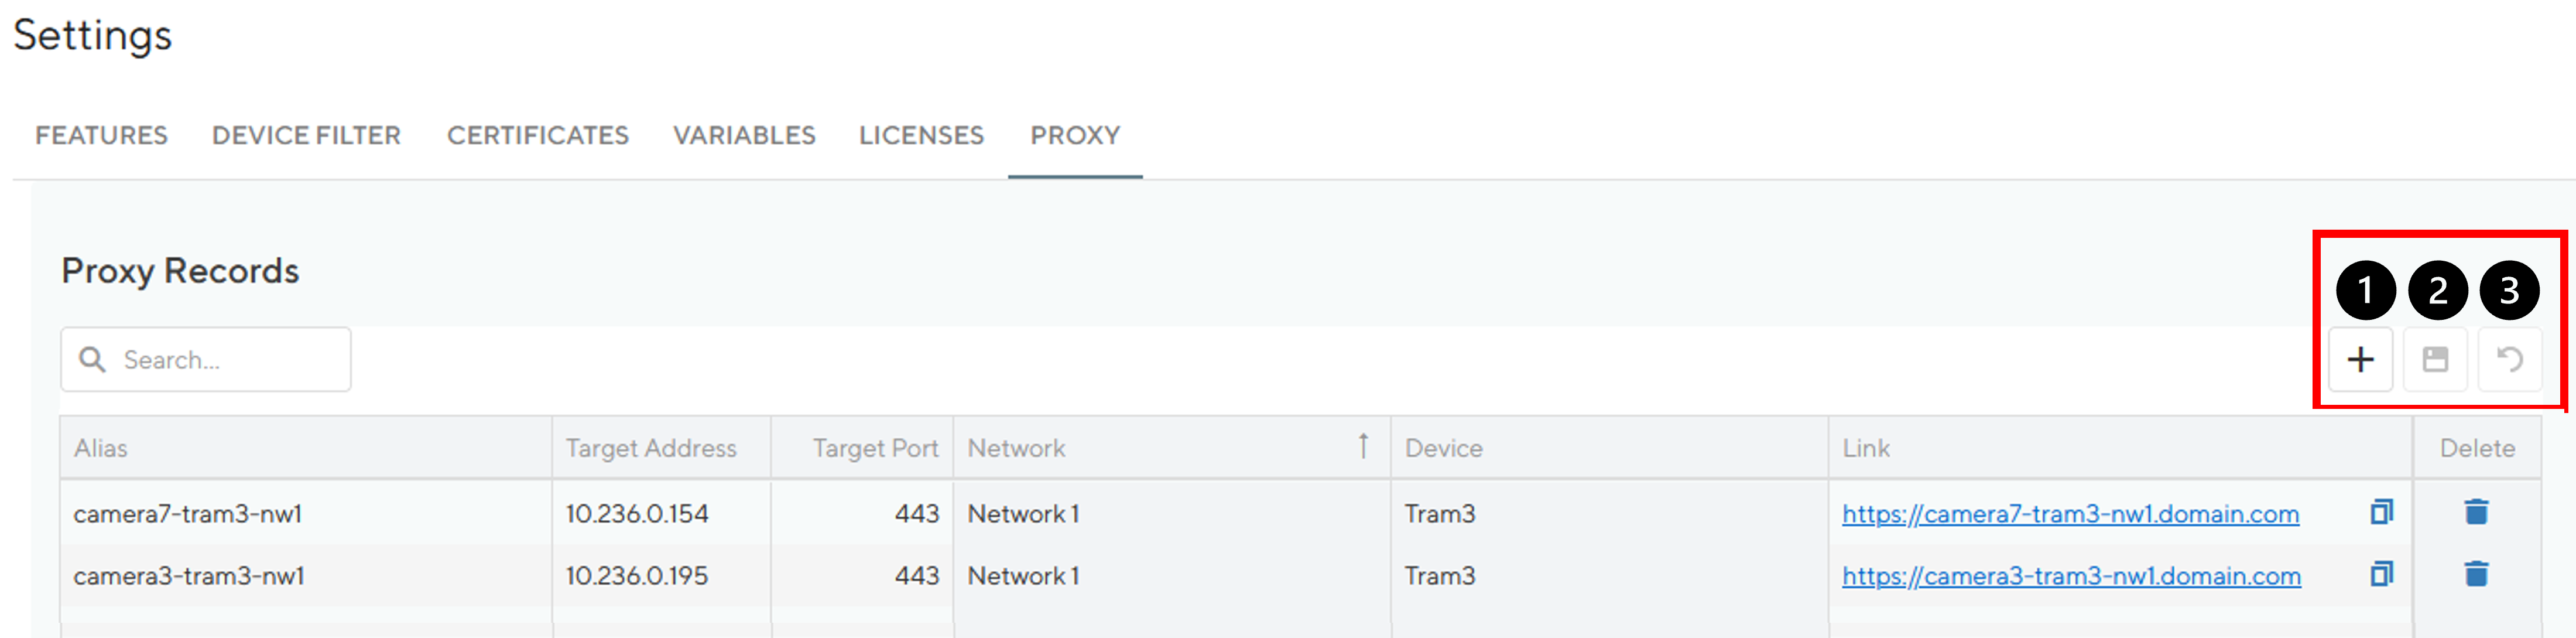
Proxy Records are managed under Global Settings. For each Device or End-Device that needs to be reached through a custom DNS record, a Proxy Record is required, as illustrated in the image below. Each record covers only one TCP Port, so two or more records are required if multiple targets on a device using different ports need to be reached.
Alias name, used for accessing the corresponding device via DNS through HTTPS
camera7-tram3-nw1
Target Address
Specify the target IP of the corresponding device or end-device
10.236.1.38
Target Port
Specify the target port of the corresponding device or end-device
443
Network
Corresponding VPN Network, owning the matched IP Address Block
Network1
Device
Corresponding Device, owning the matched IP Address Block
tram3
Proxy Records are not updated automatically, if a router gets a different address (e.g., by moving to another network), the corresponding proxy records will no longer work or must be updated manually (Target Address).
For proxy records that point to a connected device, we recommend configuring the router to assign a fixed IP to the connected device. Otherwise, the proxy record can also become invalid suddenly if the connected device receives a different IP.
To access the Devices, Connectivity Suite provides OpenVPN to access.
A VPN connection to the Provisioning, the Backend or any custom VPN Network Server must be established.
This means the user needs to run an OpenVPN client.
The configuration and certificates needed for the VPN connection can be downloaded from the Connectivity Suite via the Service Access function.
While the VPN Connect client often works, make sure you are using the Community Edition of the OpenVPN client. The commercial version of the OpenVPN client is not officially supported by the Connectivity Suite.
VPN Network: The user can access any Device within the VPN Network by using the VPN Address of the Device.This is helpfull if the user shall access only Devices of a specific VPN Network.
Platform Network: The user can access any Device within the Platform Network by using the Platform Address of the Device. This is helpfull if the user shall access Devices of different VPN Networks.
Provisioning Network: The user can access any Device within the Provisioning Network by using the Provisioning Address of the Device.
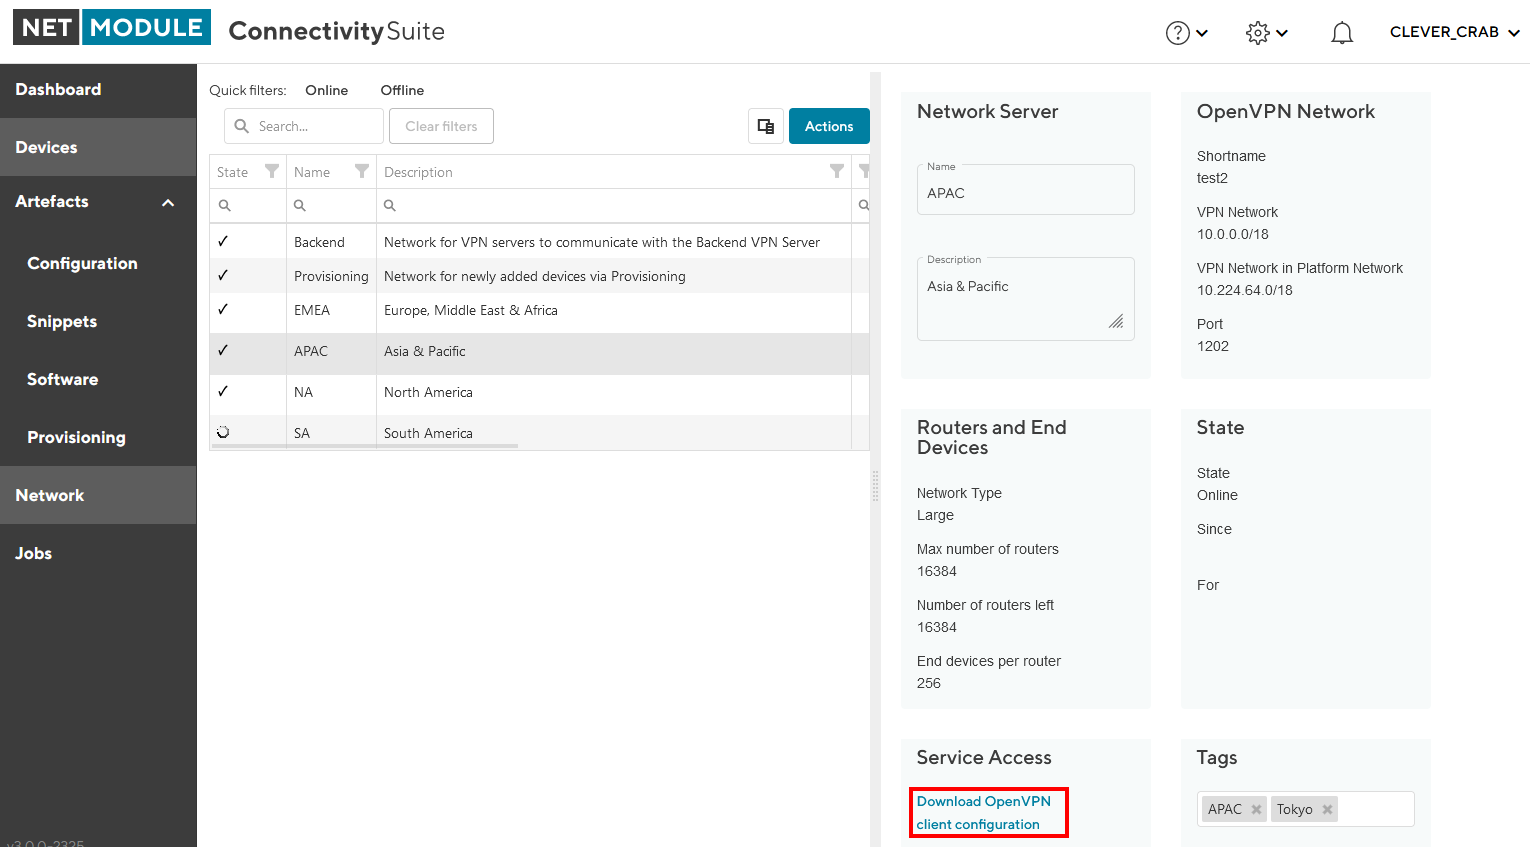
Navigate to the page “Network” of the Connectivity Suite. Select the Network where the required Device is assigned.
Click on “Download OpenVPN client configuration” at the Detail dialogue box to download the OpenVPN client configuration.
Start the OpenVPN client on your client pc and upload the downloaded file from step 1 into the OpenVPN client to establish a connection with the Connectivity Suite.
After the connection has been established Navigate to the page “Devices” and select the required Device in the main dialogue table.
Use the IP-address shown in the Detail dialogue box to access the Device.
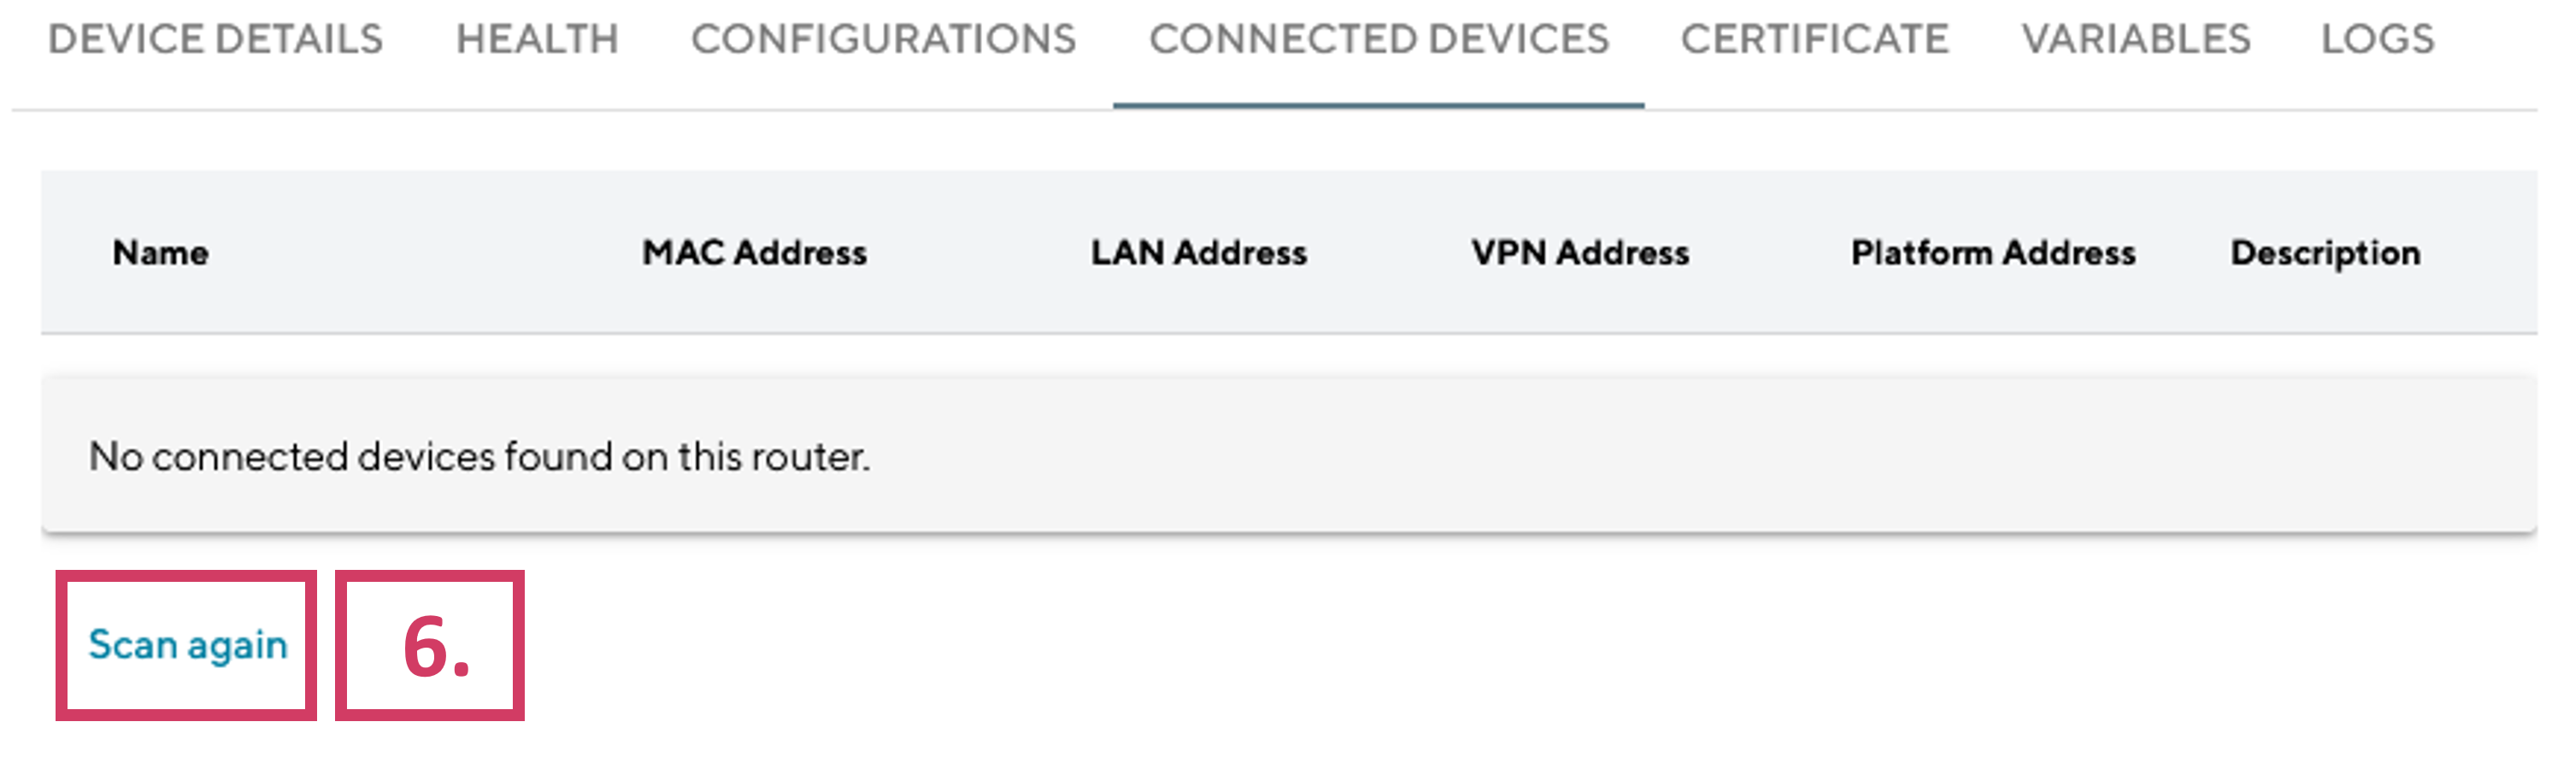
Select now the router in the Device Liste and open the tab Child Device in the Detail dialogue box and click on the “Scan again” button. The Child Devices are now displayed in the table.
Only NAT rules whose settings for incoming/outgoing interfaces match the OpenVPN tunnel used by the Connectivity Suite (usually TUN1) are adapted. This prevents unwanted changes to uninvolved rules.
In order to access connected devices behind a router via the Connectivity Suite, NAT rules must be defined on the router which map VPN IP addresses to LAN IP addresses.
When a router is moved to another VPN Network, these NAT rules have to be adapted, as the VPN IP addresses will change. These adaptions are made automatically and are included in the new device configuration which is deployed during the device move process.
Both the rules for host mapping and for network mapping are adapted, in each case both inbound and outbound rules.
For calculating the adaption, only the host part of the VPN IP address is relevant. This allows the user to define generic NAT rules in the Provisioning configuration where the network part of the VPN IP address is just a placeholder. This generic rules will then be adapted to individual rules as soon as the device is moved to a network.
Example for host mapping
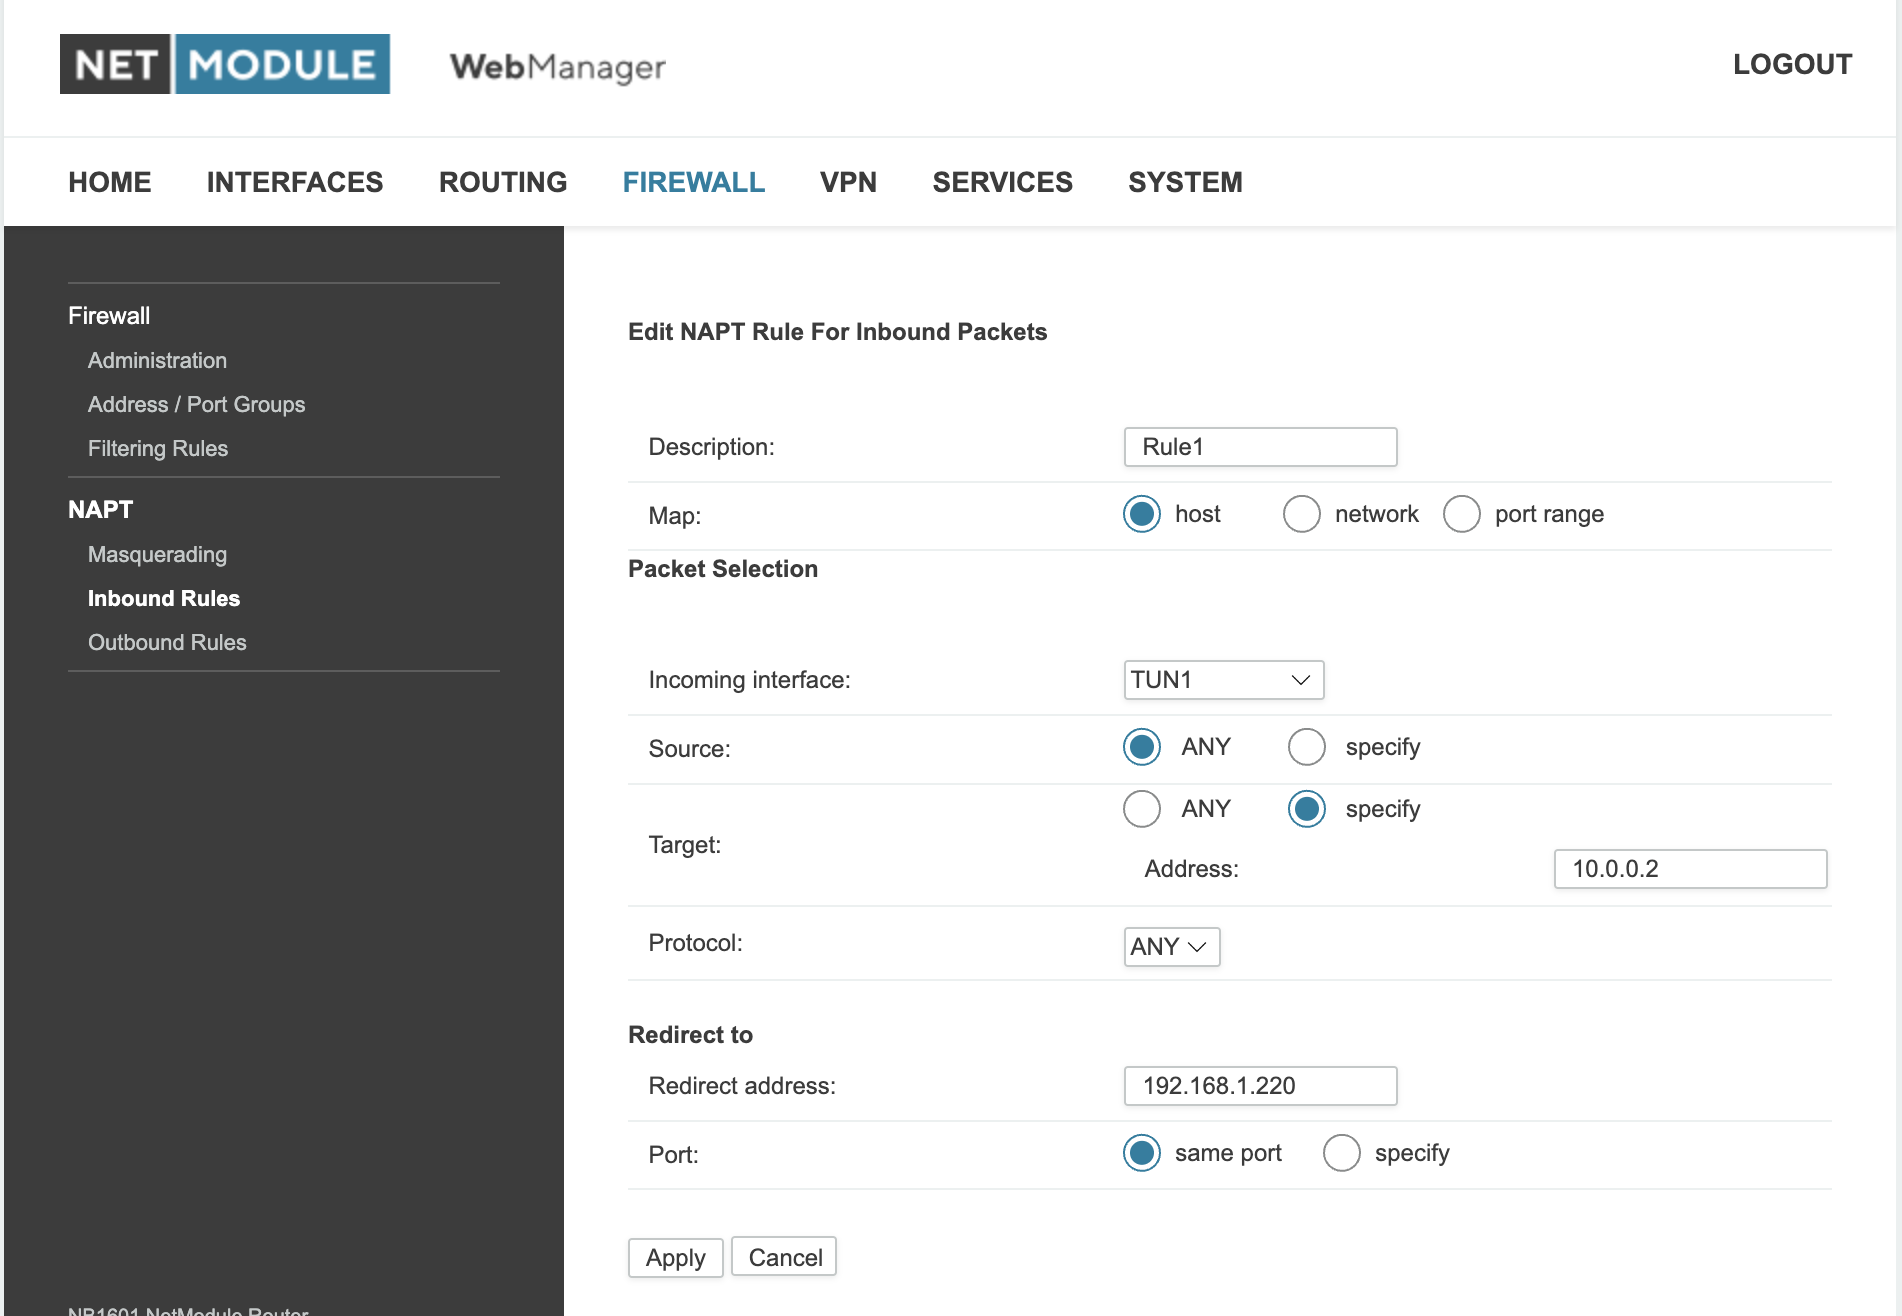
Let’s assume you are dealing with /25 device subnets (128 addresses), and the connected device with the LAN IP address 192.168.1.220 should be accessed via the second usable VPN IP address of the device subnet (the first usable address is the router’s own VPN IP address).
The VPN IP address we use for this rule is then 10.0.0.2, where 10.0.0 is the placeholder for the network part and .2 is the relevant host part.
The corresponding settings in the Web Manager would then be:
Fig. 11.8 Host NAPT settings for Provisioning Configuration
Above rule says that the second usable VPN IP address of the device subnet is mapped to 192.168.1.220.
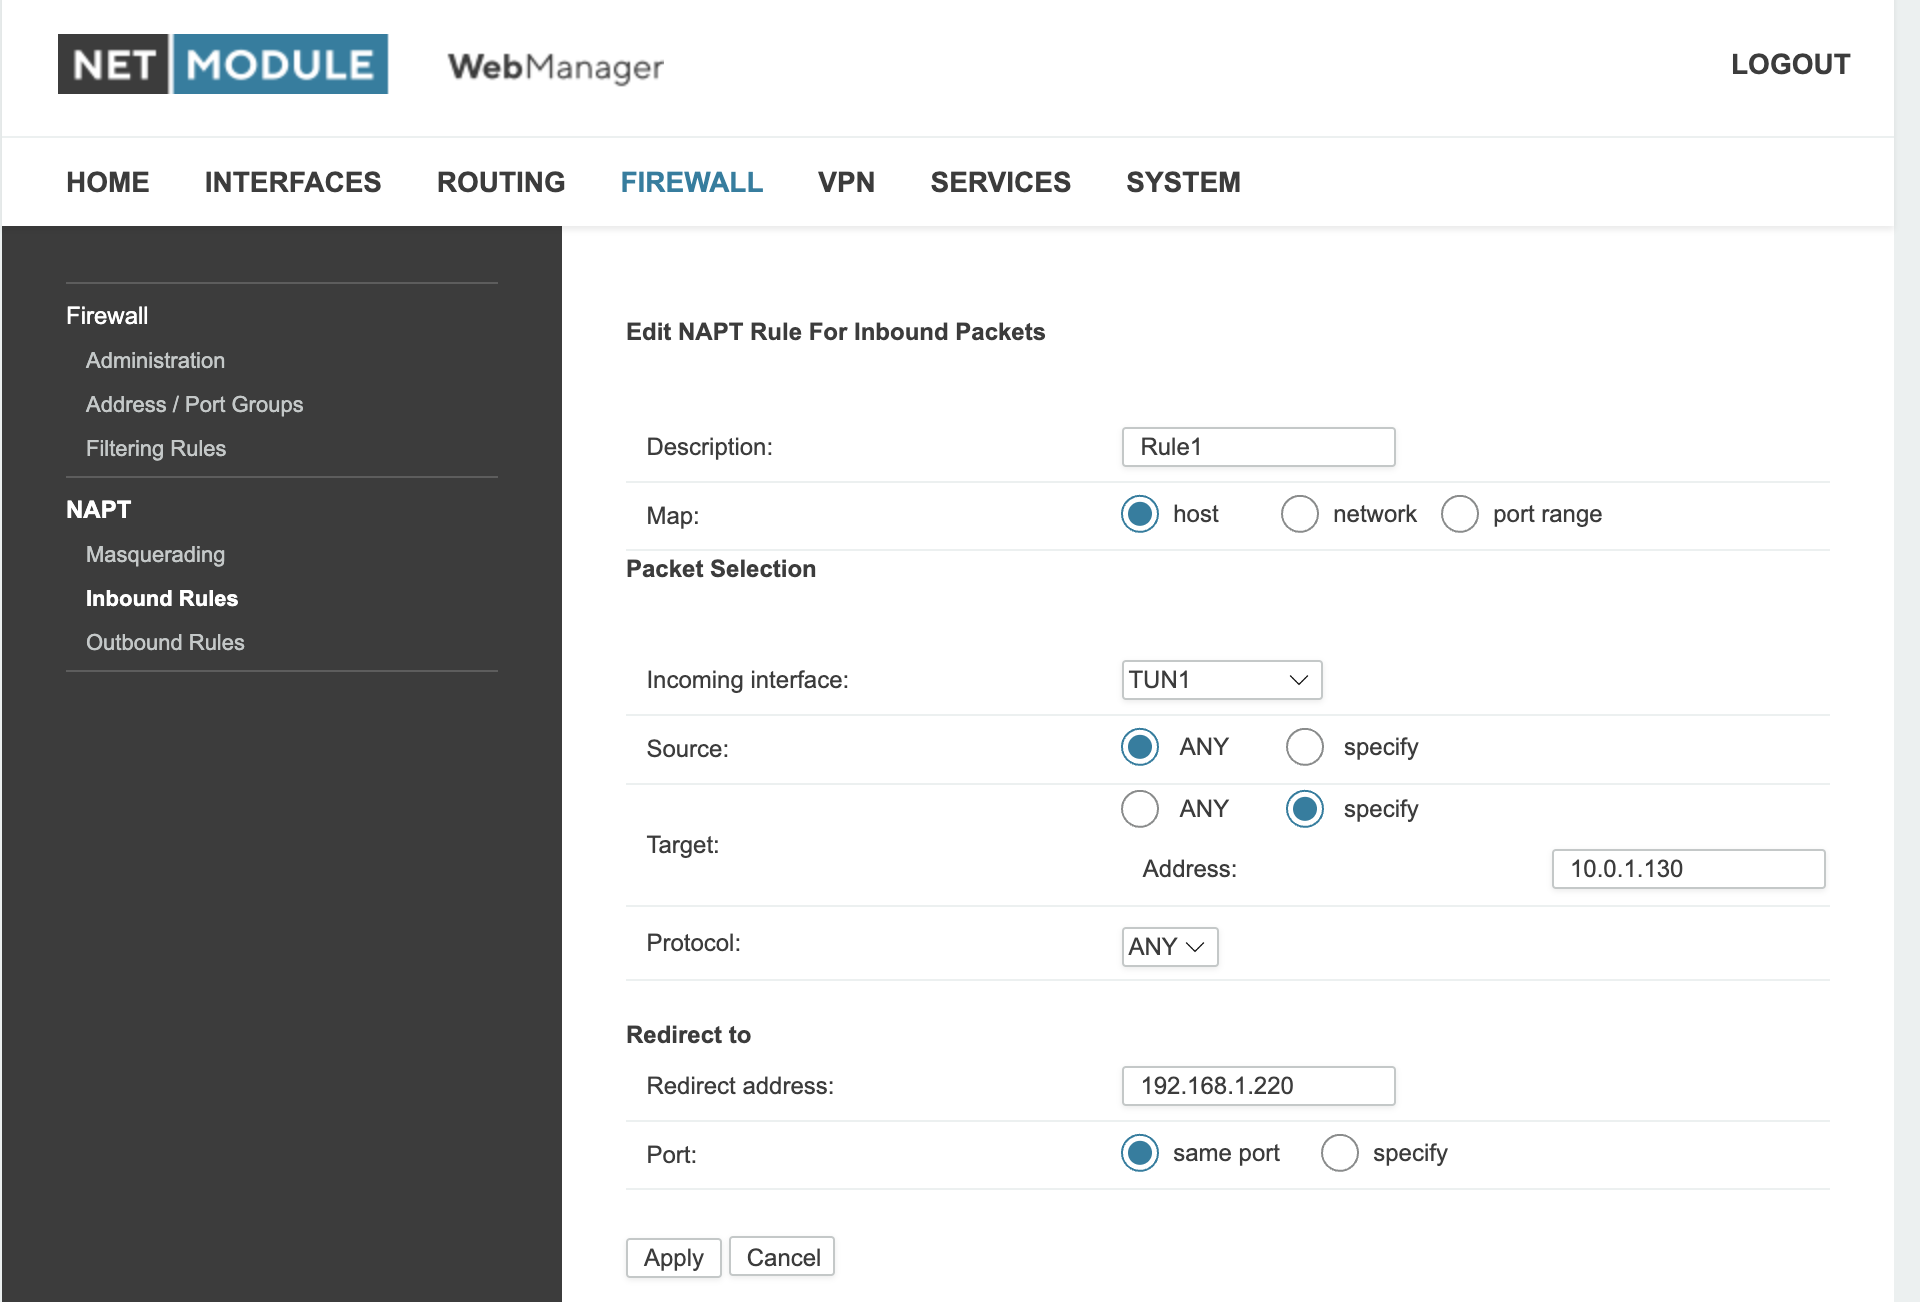
Let’s further assume we are moving a device with the above configuration to a network with /25 device subnets, and that the first 3 device subnets in this network are already used. As the next free device subnet is 10.0.1.128/25, the above rule would then be automatically adapted as follows:
Fig. 11.9 Host NAPT settings after device was moved to a network
Example for network mapping
For rules which map a complete LAN subnet, the whole VPN IP address is just a placeholder.
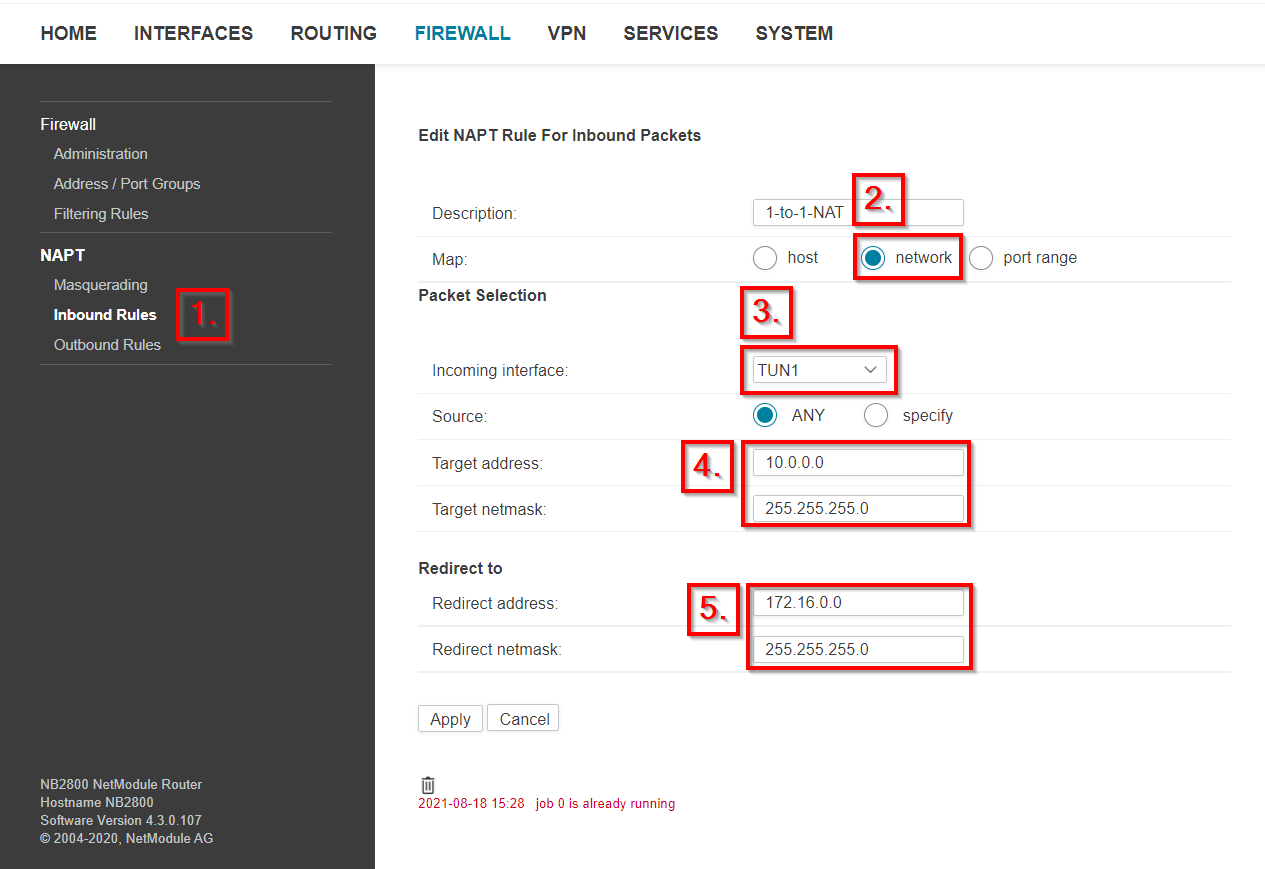
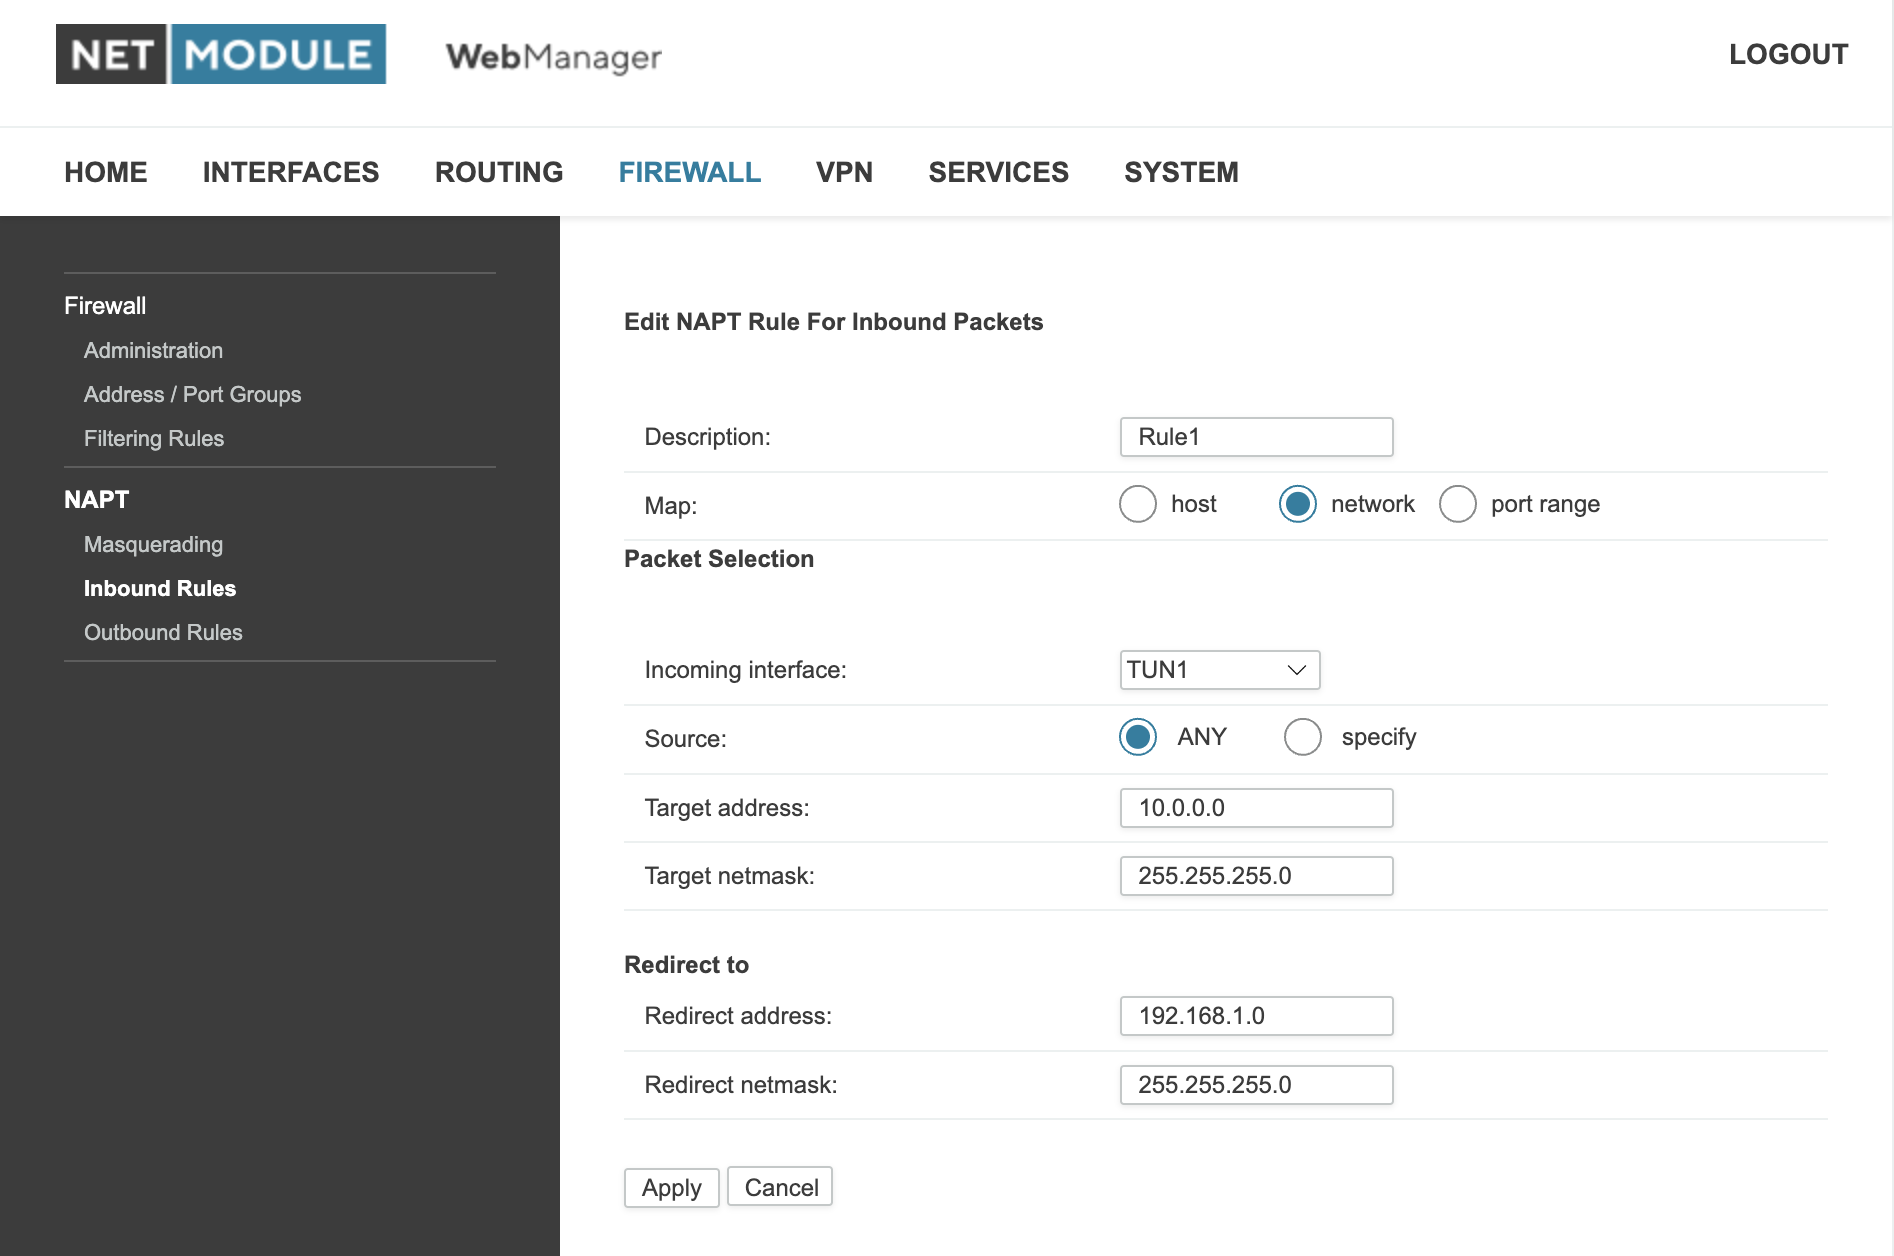
Let’s assume we want to access the whole 192.168.1.0/24 LAN of a device via VPN IP addresses. For the VPN IP address, we use 10.0.0.0 as a placeholder. The corresponding settings in the Web Manager would then be:
Fig. 11.10 Network NAPT settings for Provisioning Configuration
Let’s further assume we are moving a device with the above configuration to a network with /24 device subnets, and that the first 14 device subnets in this network are already used. As the next free device subnet is 10.0.14.0/24, the above rule would then be automatically adapted as follows:
Fig. 11.11 Network NAPT settings after device was moved to a network
11.4.2. Moving the device from a network to another network
The automatic adaptions described above are not restricted to the initial move of a device from provisioning to a network. They are also carried out if the device is later moved to other networks.